Sunday, June 29, 2014

Happy Canada Day, My Fellow Canadians!

Boy, am I ever glad that June is over... what a busy month, and I was dreading it the entire month of May! It was full of great family events, and I wouldn't trade any of them for the world, but hey, life is busy enough without all the extras!

All the end of the year class trips, my oldest son's event with sea cadets, including their end of the year trip, to the same place the class was going (Canada's Wonderland), tuxedo rental payments for his amazing graduation ceremony and later, dinner/dance. And we finished off the month with a birthday for my youngest son, and a huge (and awesome) Canada Day celebration BBQ with family. It was full of fun, for sure, but now our plan is to relax for the next couple of months and really soak in the summer.

My oldest boy only has one major event with sea cadets, he's heading off to Kingston for two weeks in general course training, at the end of which is another "graduation", which we are planning to meet him for. After that, he gets to choose specialized training in whatever he's really interested in. It will be a tough choice for him because he is interested in so many things. We cannot stop telling everyone how proud of him we are... and it's weird and wonderful at the same time, that he's become so grown up.. it's been an adjustment in that he now gets adult-type jokes... and sometimes surprises us with his own... it's rare but just enough to remind us that he isn't a kid anymore... to a point, though. There are still many things I would never discuss with him, in-depth. It's refreshing and kind of scary at the same time, because you really need to get to know them all over again! But I am so happy that we are still a very close-knit family and I hope we always are.


This is me with my handsome son on his graduation day!


This cake was made for my yongest son's birthday, inspired by his love for Wii Play's Tanks! game. To save time, I used a rainbow chip cake mix, with chocolate buttercream, and covered the cake in fondant. Rolos were used for the tires, a paper crimper was used to make the tread, and dollar store soldiers were put to work. My favourite parts of this cake are the hatch on top, and the barrel, made from a fondant-wrapped piece of dowel, with some added details.
 
I used a photo from Pinterest as an example to go by, and this cake doesn't have as much detail as the original photo, but we made it our own, and my eight-year old was thrilled! Unfortunately, being the last day of school in addition to his birthday, he was so full of junk food, he didn't end up digging into his cake until the next day! LOL!


Every year, I make something for a Canada Day BBQ we attend. No matter where we end up, it's full of fun, laughter and good friends. Also every year, I try to out-do myself. One year, it was a cake with fresh strawberries depicting the Canada flag. Then it was "hamburger and hotdog" cupcakes, and another year, a "hamburger" cake... and then I came across the idea for Father's Day to make cupcakes with a "mini-grill" cooking some weinies and burgs.... (see the previous post for that one!).. so when I saw a particular photo on Pinterest, I saved it immediately for inspiration.
 
But of course I wanted to make it my own, so I changed what was actually "cooking" on the grill. Instead of chicken legs and two burgers, I went with a nice "t-bone steak", and I think it turned out amazing! So did everyone else, because when they finally mustered the courage to cut into it, it was completely demolished... which is awesome because that means it's good!
 
Lots of photos were taken, and I received many, many compliments, but most of all, it was enjoyed, and that meant the most to me!
 
Enjoy your holiday, Canada!
 
And as always, stay sweet!

Sunday, June 22, 2014

Yay! Summer is finally here!

Hi friends! How is everyone enjoying our beautiful warm weather so far? I am so excited that we can finally go outside without layers upon layers of clothing!


You haven't heard a lot from me in the past month or so... we've just been so busy around the house, cleaning and refreshing our home. We recently cleaned out the basement. I still had clothes and toys from my boys, it was just taking up so much space. We donated a lot of it to my sister-in-law, who's little boy will be growing into a lot of those things in the near future. We also tossed a lot. It was so much work, but I love knowing that useless crap is gone, instead of taking up precious space.


We also ripped apart our front and back gardens, pulled a lot of weeds, split and transplanted a lot of our plants... our gardens look so much better now. We may only live in a townhome, but it wasn't without a lot of effort! We just finished planting flowers yesterday, and "installed" a couple of those coconut-lined flower baskets, and added some solar lights. I'm really loving our backyard this morning! (This isn't our backyard, but these are the baskets we bought)


Where to start? About a month ago, I did this beautiful cake for a co-worker's daughter. We had a lot of ideas floating around, and sometimes it can be diffficult to put them all into one cake... but I tried! I think the result was pretty good!

This cake was a chocolate and vanilla split (one flavour per tier). Pieces of dowel were instered into the bottom tier to support the top tier, which was on a plain cake board. One long piece of dowel went through both layers to offer stability. Both cakes were covered in a pale blue-green fondant, and trimmed in ribbon. Music notes were formed out of black fondant, the large one was attached with a toothpick and some buttercream. A bow was made out of the ribbon used to trim the bottom tier and placed on top of the cake to finish it off.


Next was Father's Day... It was a quiet period, remember? I was able to get so much done around the house! :) Not only that, but I have been very active in my fitness, since I got a FitBit for Mother's Day (love it, BTW... it really keeps you on your toes, so to speak!) I lost ten pounds and I'm eating better than I did all winter! Idle time is never idle time for me lol!

So anyways, yes, Father's Day. My husband was promoted at work in March, and now works in the office area of his company... so proud of him! I guess he wanted to add some bling to his work outfits and I found this old ring of his laying around the house all the time. Maybe the ring had sentimental value to him? I'm not quite sure, but it gave me an idea, so at the end of April, I asked my son to split on a gift with me, and ordered him a new ring, one that he could wear with pride and it would make him think of his family :) So we got the ring, gave it to him for Father's Day, and of course it didn't fit (I even traced his other ring to try to get the proper size!) So a new one is being ordered and he should get it within the next week. In addition to that, since I was prepping for a few cake orders, I baked some extra cupcakes and made a batch for Father's Day, complete with some cute fondant toppers!


I LOVED making the little grills with sausages and hamburgers... and the fishing rod with the little fish was my favourite. The shirt and tie was pretty fitting, too, considering his job! The boys were all smiles when they saw the cupcakes, but my husband's smile was definitely the biggest... and we all thoroughly enjoyed them. They were just simple chocolate and vanilla cupcakes (seems to be the norm these days lol) with maroon-coloured vanilla buttercream.

And then it was on!

I received a message from a mom whose little guy was about to turn one. She was ordering two cakes because two parties were in the works. Wow what a small world, it turns out, she is a cousin of one of my husband's friends, and related to someone I work with! Too funny how that happens sometimes.

The first cake was a number 1, vanilla with blue trim and decorated with stars and balloons. It turned out to be pretty cute! And the second cake was a prince's cake, complete with a crown. This cake was a chocolate bottom and vanilla top... decorated in the same colours as the number 1 cake. Both cakes were done in buttercream, and only one cake had some fondant included.

The tiered cake was not properly supported but there was a method to my madness: I was afraid of the little prince choking on a piece of dowel, so I skipped the small pieces of dowel that I would typically insert into the bottom cake to hold the top cake up. One long piece of dowel went through both tiers to offer support, but gravity was starting to take over already. Keeping it cold was this cake's best chance for survival. In the end though, mom was happy and the handsome little guy enjoyed his birthday cake, and that is all that matters!


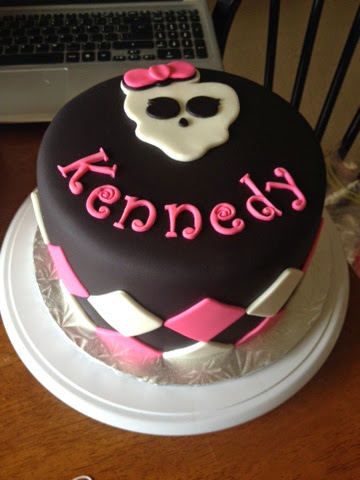
And the latest cake to date was one for my cousin's daughter's birthday. There was some indecision as to the cake's design but Kennedy decided on this one in the end. Two rich layers of moist chocolate cake, with a chocolate mousse filling, covered in black fondant. Pink and white checkered fondant deck the sides out, and a hand-cut Monster High logo decorates the top, along with the birthday girl's name.

Mom said that the cake was VERY well received.. and that, my friends, is what matters most to me! I love that I get a chance to help people celebrate special moments!


So, as we trudge through the final week of school... I am proud to say that my oldest son, Tyler, is graduating grade eight tomorrow. He has his tux and is all set to go to dinner with his friends in the limo they are sharing. I couldn't be more proud of him as he embarks on the new journey which is high school.

My youngest son, Caleb, has had a trying year at times, and still managed to come out on top, improving his reading skills substantially, and rocking his spelling tests, science tests, and showing me and his father that his brother wasn't the only one blessed with brains. We are all looking forward to his fresh start next year as he begins grade three. So proud of both of my wonderful, handsome boys!

Hopefully I will get the opportunity to help you celebrate something special this summer.. send me your pictures and ideas and let's create a special cake just for you!

As always, stay sweet!


Saturday, May 3, 2014

Let it go... let it goooooo!

It's been a crazy week here... this is the first opportunity I have had in over a week to sit and write this, and I have been dying to share!


But first, what is going on with this "spring"? I can't believe how cold it has been! We love to have our windows open, to freshen up the house and let the warm air in, but we've only really had one day we could do that so far. It's so frustrating! I want to stop wearing sweaters, and get out there to exercise with my family! Rant over. :)


So, I had the pleasure of "meeting" this client through my brother's girlfriend... she was looking for a fondant Disney Frozen cake, and I was really happy that I was referred to. I've been wanting to do a Frozen cake for awhile.. my youngest son is a huge fan of the movie and the soundtrack (it inspired him to join the school choir, boy, were we ever shocked!).


At any rate, we passed ideas back and forth and I sent her several photos of ideas for her daughter's cake. We liked elements from several cakes and I love combining ideas to make an original cake. I have to say, it's my favourite way to cake!


We decided to buy a toy figure for the top of the cake, because making one from fondant would be extremely time-consuming and costly for her. But when I couldn't find anything, I messaged her right away to find out how she wanted to proceed. Her amazing idea, that I never would have thought of, saved the day... and I immediately went to look for Disney Infinity characters. I've seen the figures, but never paid much attention before because I didn't know what they were for. When I found Anna, I was so relieved and could concentrate on the rest of the cake.


One of the ideas used was rock candy suckers in white and blue. By the time I figured out where to buy them, they were being discontinued and the only colours left were red, green and purple. I chose the purple, and wondered how I was going to find these if this cake was requested again... I'm still looking into it.


The other idea that I fell in love with was the candy ice. There was no other way to get this look, although, I made marbled fondant triangles and let them dry ahead of time, just in case this plan didn't work. I am glad I did that, but I didn't end up needing the fondant and my husband ended up snacking on them! LOL!


If you like cake and have never been to this site, you need to check out Coolest Homemade Birthday Cakes. They allow anyone to post their cakes on the site, and they encourage the poster to share their experiences and how-tos with everyone. So the one I came across had the candy ice and I wish I could find the cake again so I could thank the author.


She took clear, wrapped candy mints and melted them in a silicon pan in the microwave and poured the mixture onto a baking sheet to let it harden. I couldn't find a silicon pan before I made this cake, but I won't stop looking! I lined a square glass baking dish with waxed paper and then foil on top, and then melted a bunch of mints in a glass loaf pan in the microwave. It was Pyrex, so I was relatively confident that it wouldn't break or crack. The mixture cooled down SO fast, and in turn, I had to work very fast. It was very bubbly and foamy and not easy to scrape into the lined pan I had ready, but I did the best I could. Then I put a few drops of blue food colouring on the mixture and swirled it with a silicon spatula over the melted mints. I let it cool right down and then wrapped it up in the foil, still not sure if it would peel off properly. For the record, it broke easily off of the spatula after it cooled... silicon really is your best friend if you try this.


My family and I were eating dinner just after I did all of this, and I figured the loaf pan could have the cooled, and the mint mixture could be chipped out of it when it was time to clean the pan. We were all nervous as we heard the mint mixture cracking in the pan, it was funny...after we figured out what the noise was!


The day before the cake was to be picked up, I filled and crumb-coated the square chocolate cake, and decided to decorate it diagonally. I covered it with white fondant, and trimmed it in a sparkly, shimmery blue ribbon. My husband trimmed off the wooden balls at the bottom of the rock candy sucker sticks, so they could be inserted into the cake. While he did this for me, I unwrapped the candy ice and tested it to see if I could unpeel it from the foil. I forgot to spray it with cooking spray before I poured the mixture in and I was dreading picking bits of foil from it, but it peeled off really easily!


Once it was unpeeled and free from the pan, I needed to break it into three or four "shards", hopefully triangular, like the ice in Elsa's fortress. I scored it first with a very sharp knife and then cut into it. Surprisingly, it cooperated lol! There were a few jagged edges throwing the shape off a bit, so I tapped them with my sharp knife, and was able to trim them into the shapes I needed. I also got some smaller pieces to use at the sides.


I took the largest, tallest piece and pressed that into the back corner of the cake, and took the next two large pieces, and staggered them in front. I put the two smaller pieces at the sides, and really liked how the fondant sank around the "ice" to make it look like snow. I pushed the rock candy suckers onto the cake around the ice, and put a dollop of buttercream on the bottom of Anna and placed her in front of the ice shards.


Then I made the birthday girl's name and age out of blue fondant using Tappits, and then tinted some extra buttercream light blue and piped little stars all over the cake, concentrating more on the sides.


It looks like a simple enough cake, right? But there were a couple of hurdles along the way, and I ended up needing to replace my loaf pan, the old one couldn't be saved. No biggie.. it all boils down to learning experience! Neeeeeeed to find a silicon pan lol!


And there she is, Anna in all her icy finest! I was lucky to hear some very positive feedback about this cake, and the birthday girl was very happy!

Stay sweet!

Saturday, April 12, 2014

Springtime Sunshine

And so are the all the birds! It is SO nice to finally have spring weather, isn't it? Unfortunately, we are expecting snow on Tuesday, after a few days of 20 degree weather. But I'll take it!

I have some catching up to do with pictures, it would seem :)  I've had the pleasure of creating some pretty amazing cakes lately and it's time to share!


 This cake was so fun to make, it was to celebrate the birthday of my son's friend, and it was chocolate with chocolate buttercream. It was relatively simple, the figures in front took a couple of nights to make, because certain parts needed time to dry, but everyone at the party really enjoyed the cake... the party was a lot of fun too!

So, I used two layers of chocolate cake, filled it with the chocolate buttercream and crumb-coated it. I rolled out some white fondant and covered the bottom half, instead of choosing to cover the whole cake, which would have made the cake so much heavier. I covered the top half with red fondant, and cut and attached the other pieces to make Big Red.

I was asked if the small figures were cake pops, which was interesting because I hadn't even considered using pops, but I totally could have! Instead, they are balls of fondant, with eyes, beaks and other additions attached. I secured them to the front of the cake board with some buttercream, after arriving at the party. The beaks wouldn't have fit into the box without falling off (next time, I would get a bigger cake board instead). The birthday boy was VERY happy!


Next was this beautiful beast. This cake was my nemesis because after baking it, it challenged me at every turn afterwards. It's beauty is very deceiving!


 The bottom layer is a ten inch chocolate raspberry cake, with whipped raspberry mousse filling. It was crumb-coated in a deep pink, raspberry buttercream, before being decorated with raspberry buttercream rosettes. Four dowels were inserted into the cake to support the cake above it, which was an eight inch banana cake, with a whipped banana mousse filling. It was crumb-coated in a lighter pink, banana-flavoured buttercream, and done up in matching rosettes to create a beautiful, two-tiered bridal shower cake. One long piece of dowel went through the center of the top tier, through the cake board and through the bottom tier to support the entire cake and to keep it from slipping or sliding. The two tiers were finished off with a white lace trim, to match the bridal theme of Roses and Lace.

Problems: I forgot that the bottom cake was chocolate instead of banana, and I made a HUGE batch of banana buttercream, because rosettes take a LOT of buttercream. I used about half of the batch, and had to toss the rest.

The next problem was trying to figure out how to do rosettes on the top tier without screwing up the rosettes on the bottom tier. Too make a long story short, I needed to scrape off the rosettes once, and the top tier needed to be redone. When the rosettes were finally done, and looked uniform in size, I trimmed both tiers in a delicate white lace ribbon. This was another problem because the ribbon soaked up the pink colour from the buttercream. I replaced the ribbon once, and doubled the ribbon layer so that it would soak through the bottom layer, and not show through the top one. The cake was going to be picked up the following day, so I had some time to see if this theory would work.

The following day, just to challenge me again, the ribbon looked tie-dyed! LOL! The ribbon idea was NOT going to work, and they were picking up the cake that evening. It still needed one more evening in the fridge before the actual event, and I knew that replacing the ribbon was not going to help. I needed a different ribbon.

My husband, patient as a saint, and oh-so-lifesaving, ran out to buy a thicker ribbon for me. He took pictures of two and ultimately, he made the final decision, and it worked. It looked so much more defined against the cake.

And lastly, finding a darn box for the cake was next to impossible. My husband brought three boxes home from work, and we couldn't use a traditional cake box, either. The cake was too tall, and way too heavy for a flimsy cake box. The first two boxes weren't wide enough for the fourteen inch cake board and the final box he brought home was massive. In the end, the client decided against the box altogether (but at least we had one available). I was happier not putting it into a box because of the history I had with this cake by this point, and I knew the more it was handled, the worse the outcome would have been.

I can't lie, I was never so happy to say goodbye to a cake. Beautiful, yes! Tasty, yes! Made an impression, yes! Taught me a lesson, absolutely! I have learned so much from this cake, it's unreal. Never make assumptions on how simple a cake will be to make, because that's when you run into challenges like I did. I am actually looking forward to the time I get to make something similar to this cake again because of everything I have learned. :)

And the most recent cake I've made was a redemption of sorts in my cake world. I've been wanting to take another run with the giant cupcake cake, since I wasn't thrilled with my first attempts.

My husband informed me, nearly a month ago, that his office is having a potluck and he was hoping I could do something in cake for it. So, I put some thought into it and decided to do a dozen cupcakes and the giant cupcake cake. I wanted to do something cute, something to make an impression, since he chose the theme of babies, since it was partly to say goodbye to a co-worker who is going on mat leave.


She is a chocolate fan (I love her already! LOL), so I went with chocolate. The cupcake cake was filled with a peanut butter filling. Since she didn't know the gender, I went with a pale yellow and green theme. I made the toppers two evenings before, to give them time to dry.

On the evening before, I crumb-coated the giant cupcake bottom, and wrapped it in green fondant, and secured it to the board with some buttercream. I filled it with peanut butter filling, and placed the top on, after crumb-coating it. I then did small rosettes all over the top, and decorated it with fondant flowers and a leaf. The cake was done!

Then the cupcakes were also done in rosettes (seriously, I am addicted to rosettes now!). I topped 6 of them with the fondant pea pods, which were made up of three balls of fondant, two green, one in skin colour. I used some green fondant to make pacifiers and some skin colour for a nose on each. I debated buying some food markers to make the eyes, but I really didn't have time, so I ended up using Americolor brand black gel colourant with a few drops of vodka. I mixed these up and used a toothpick to paint on the sleeping eyes.

I topped all of the cupcakes and we were good to go! I heard some very positive feedback, and several people even took pictures. That makes me so happy!


So gosh darn cute, right?
 
 
Well that's it for now... off to spend some time outside with my family, enjoying this gorgeous weather while we have it!
 
 
As always, stay sweet!

Saturday, March 1, 2014

Marching towards spring...

Wow, what a winter this has been! So cold and so much snow... I think I speak for all Ontarians when I say we're ready for the end of winter. Our water pipes have frozen twice, leaving us with no water in the main bathroom for two three days at a time. The kids have missed more school this year because of the weather than they ever have before, and I can't stand winter on the best of days! I can handle it on Christmas Eve, Christmas Day and maybe Boxing Day, for all the festivities, and then as far as I am concerned, it can all melt and torture someone else lol! But let's face it, we all want BBQ season back with those long, hot, lazy weekends! Am I right? Bring it!

I am excited to say that I have March Break off with my kids, the only downfall is that my oldest son is going to Ottawa with the Sea Cadets (for winter fun lol). They will be touring the Parliament building, skating along Rideau Canal, and enjoying some snowboarding and skiing. He is going to have so much fun and I will miss him so much! But he's back mid-week and then we can all hang out together :)

This cake is the last one I did for the month of February. February was a very busy, very productive month for me and I loved it! When I look back, I wonder how I did it... and then I remember, my family helped me. My husband was great in helping me out with the assembly line for Valentine's Day and making sure I had enough supplies (I stockpiled for awhile before the big Valentine's Day promo!). I couldn't have done it without any of them!


This part was impressive enough! After covering the cake in green fondant, I trimmed dark chocolate KitKat bars into varying lengths and secured them to the side of the cake with buttercream as a fence-like trim. Then I piped grass around and in between them and put the yellow piece on with the big number 6. The second part needed to dry for two days before I felt comfortable putting it on the cake (and I still wasn't entirely sure it would stay put!)


I started this part on the Tuesday evening before the cake needed to be picked up. I began by cutting a tree trunk out of chocolate fondant and scoring marks in it to make it look like bark. It was attached to a piece of green fondant at the bottom, but you can't see it very well in the picture.

Then I went to work on Phineas and Ferb. I'm going to be honest, I have never seen the show, and if you're a fan of the cartoon, you can tell because of the placement of orange hair lol! I'll tell more about that later! Cutting out all the small pieces was no problem, but I learned a lesson about 6-7 months ago with another project with all kinds of little pieces... USE royal icing to secure them! So I did... but it wasn't until the following night that I recalled this important information (I blame memory lapse on my kids!).

I kept everything separate until the evening of pickup. My oldest son mentioned that the one guy was missing hair (guy... lol... again, never seen the cartoon!). The customer was waiting in my hallway as I put the finishing touches on (the grass, the bushes). So I put some orange squiggles on top of his head... I looked at him, and he's like, "Nooooo. It's not curly!" I scrape it off and try again. I look at him again for confirmation... aaaaaand he shakes his head. I said, "What is the problem?" He goes, it's at the very back of his head." I said, "You mean where the other guy's (lol) head is?" He tells me yes. I said, "Well, I can't put it there! The guy's head is there, this will have to do!" LOL!

In the end, the little boy was very happy with his cake and that, my friends, is all that matters!

Stay tuned for the next post, and stay sweet!

Sunday, February 23, 2014

A Golden February!

WTG Team Canada on your Sochi 2014 success! Hard not to brag a little about my country's medal standings... top three is pretty awesome! I am so proud of all of our athletes and the game they brought to Sochi!

I've had a busy but fun week! Started off the week with Family Day, and then helped my friend celebrate her birthday the following day. I have been wanting to make caramel buttercream for awhile now, and thought pairing it up with chocolate cupcakes would be perfect for her.

The recipe seemed simple enough but I didn't read it through all the way and realized at 9 p.m., the night before bringing the cupcakes into work, that the mixture had to be partially cooked, then cooled and then whipped. Um, ain't no one got time for that! LOL Not at that hour. So I had to improvise.

I took out a can of dulce de leche condensed milk, and mixed it with icing sugar and some meringue powder. It smelled and tasted divine! Unfortunately, it wasn't as stable as regular buttercream, and I had to work fast and keep the cupcakes refrigerated to make sure the buttercream kept it's shape. it worked and they were a hit!


Obviously, I need to plan ahead a bit more next time I want to make caramel buttercream but it turned out pretty good!


We also had company over for dinner and I made my son Tyler's favourite dessert... Chocolate Brownie Trifle...


And of course, my latest pride and joy was a cake/cupcake combo for a friend's three year old daughter. She was having a birthday party with her little friends and I was so excited to do this cake.
 
 
I did a trial run a couple of weeks ago on a strawberry cake, and it was for this request. My friend asked that the cupcakes be chocolate, and of course, how can I say no to that? LOL!
 
 
Anywho... I iced and filled the cake and draped the pink fondant on top. I had cut out two black fondant circles a couple of days before to allow for drying time. These were going to be the ears on the cake. I put on some white fondant polkadots, and used matching ribbon to trim the cake, and also used some for the big bow.
 
 
To keep the ears upright, the night before the order was due, I cut out two smaller circles of black fondant and sandwiched a lollipop stick in between the two pieces and let that dry overnight. This allowed the ability to pop them right into the cake like suckers.
 
 
For the cupcakes, each one was first piped with vanilla buttercream. Then I put two mini Oreo cookies at the top for ears, and then a large Oreo right underneath those. My friend was going to have a couple of extra cupcakes so I took the initiative to put a mini polkadot bow on one of the cupcakes just for her daughter. I'm glad I did this because in the end, she decided to serve the cupcakes at the party and save the cake for her daughter's actual birthday. :)
 
I also included backup ears in case the ones I put into the cake fell apart or drooped (sometimes fondant is unpredictable, but I was fairly certain the fondant ears I made would last)... I just pried two Oreos apart and put a lollipop stick in between, and added some extra icing to the cookie sandwich.


I am incredibly pleased with the results!


Now I am off to find something to do since the Olympics are over :(  So boring... maybe I'll bake!
 
 
Stay Sweet!


Saturday, February 15, 2014

Valentine's Day 2014

How was your day? Did someone show you some extra love? Did someone make your day just a little bit special?

My Valentine's Day started a few days before.. actually the weekend before. I began baking for my customers and preparing for all the orders. I also baked and froze cupcakes for National Cupcake Day coming up on the 26th. My boys will be each bringing in a dozen cupcakes to sell.

Then I had to try to catch my oldest when he was home to ask him what he wanted to do for his class valentines. He had cadet winter survival camp, and then worked Monday and Tuesday and had cadets on Wednesday. I'm really missing him, he needs to stay home more! So the kids told me they wanted to do the same thing as last year... So I had to take their pictures to make it happen:


It makes me sad to know that this will very likely be the last year Tyler will hand out valentines. Where did the time go? How is he heading to high school already?   :(  He told me his classmates were pinning the card to their shirts...  LOL!


I still have a few years with this cutie-pie though... his valentines were a total hit! And why not? Who can resist that face? Definitely NOT his mom! LOL


I didn't get to take pictures of the Valentine production line, it was just too busy. But the promotion was a big success, and I will likely run something similar again in the future. It was fun to do something like that... brings me back to the days I worked in the bakery when I had multiple orders to fill. Much more enjoyable doing it at home though!

Before Valentine's Day, I had a few ideas in my head and decided to make them a reality. I created some white chocolate cupcakes with white chocolate icing. They were scrumptious!


It's hard for a chocoholic to venture out of her chocolate haze and make something different, BUT... I enjoy doing it because it shows versatility and gives me a terrific opportunity to try, and offer, something different!


This cake was mostly chocolate with white chocolate drizzle and trimmed with pretty cream-coloured lace ribbon and bow. Simple elegance!
 
 
Then I did a trial run for a strawberry cake that is on the menu for a little girl's birthday next weekend. My family loves when I do trial runs... they have no shame in being my guinea pigs, none at all! I was playing with two ideas for this one... the strawberry cake, and the white chocolate icing.
 
The white chocolate icing is made up of two ingredients, butter and white chocolate, but it's cooked. It's a process of melting the butter and mixing in the chocolate and letting the blended mixture get cold in the fridge overnight. The next day, you put it in your mixer and beat it. This mixture becomes light and fluffy and so easy to pipe. The only tricky part with this icing is that you need to pipe quickly. The heat from your hands warms up the icing bag, and the icing, and if you aren't quick, it becomes too soft and won't hold its shape after awhile. I definitely will NOT be using this recipe for any summer cakes... it will just end up being a melted mess. But for winter, it's out of this world.
 
If you'd like to check out the recipe, I found it here.


I didn't make anything special for my honey for Valentine's Day. I know, terrible of me. But, I have plans for a chocolate trifle for when company comes over for dinner this weekend, and I'm going to try something new with my chocolate cupcakes to help a friend celebrate her birthday on Tuesday. Stay tuned for that.
 
If you've been wondering how my experiments with my new toy, the Cricut Cake, have been going, I'll be honest... it's not even out of the box yet. Here's why! The SAME weekend I bought it, I sliced my finger open on my Pampered Chef slicer while cutting vegetables to make homemade chicken soup. I was SO angry at myself because I decided against using the safety guard... and wouldn't you know it, it's actually provided for a very good reason.   >:(   Not one of my brighter moments, that's for sure. Anyway, it took forever to heal and I wasn't about to play with fondant in that condition. Note to self, don't think you're too smart to use the safety guard! Anyway, I am all healed now and hope to crack that baby open VERY soon! Maybe this weekend!
 
Happy Family Day to my fellow Canadians... enjoy your weekend with your family!
 
Stay sweet!